
For thirty moves you kept your king tucked away: castled, pawns in front, every check counted. Then the queens came off — and the king is still sitting on g1. You shuffle a rook back and forth while your opponent marches their king to the center, then to your pawns, and ten moves later picks them off one by one. An equal endgame turned into a loss without a single blunder.
It's the quietest mistake in chess: in the endgame, the king isn't the piece you protect — it's the piece you play with. An active king wins more pawn and rook endgames than any clever line. Here's why, how to tell it's safe to bring it out, and exactly where it should go.
The king in the endgame: once the queens are gone, it becomes a piece
In the middlegame the king hides not because it's weak but because it's priceless: one missed check and the game is over. Mates are delivered by the queen and friends. With the queens traded and only a few minor pieces left, there's simply nothing left to weave a mating net with.
That's when you discover the king is a strong piece. It hits in all eight directions, defends its own pawns, attacks the enemy's — and can never be traded off. Its fighting strength in the endgame is usually put at three to four pawns, roughly a knight or a bishop. A king on g1 is a piece that isn't playing. You are effectively a minor piece down.
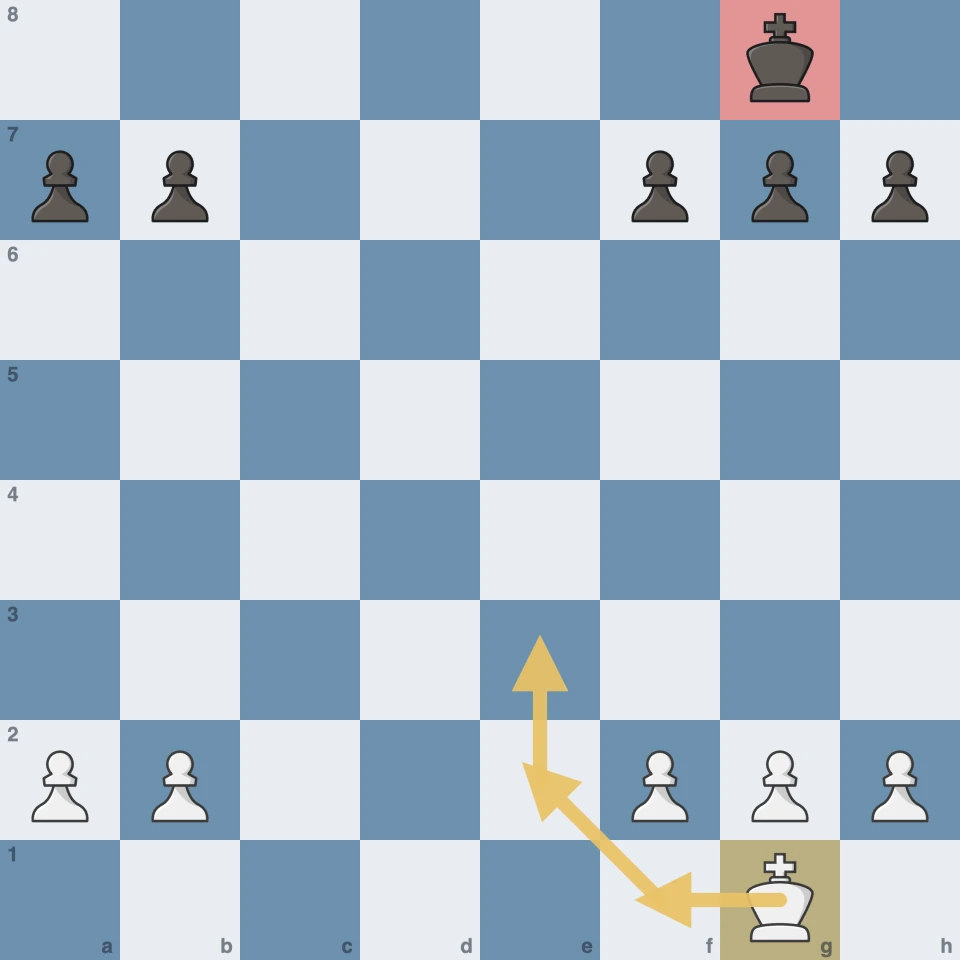
Look at the position above. Material is level, the pawns are symmetrical, nothing is happening. Stockfish at high depth gives exactly 0.00 — and its first choice isn't a pawn move or anything tricky. It's Kf1. For Black, the same: Kf8. The first move of the endgame is almost always a king move.
Two tempi turn a draw into a win
Now the same position, except White walked the king — Kf1, Ke2, Ke3 — while Black spent the time on "useful" pawn moves: a6 and h6. You've seen it: "let me make some luft first, then we'll see."
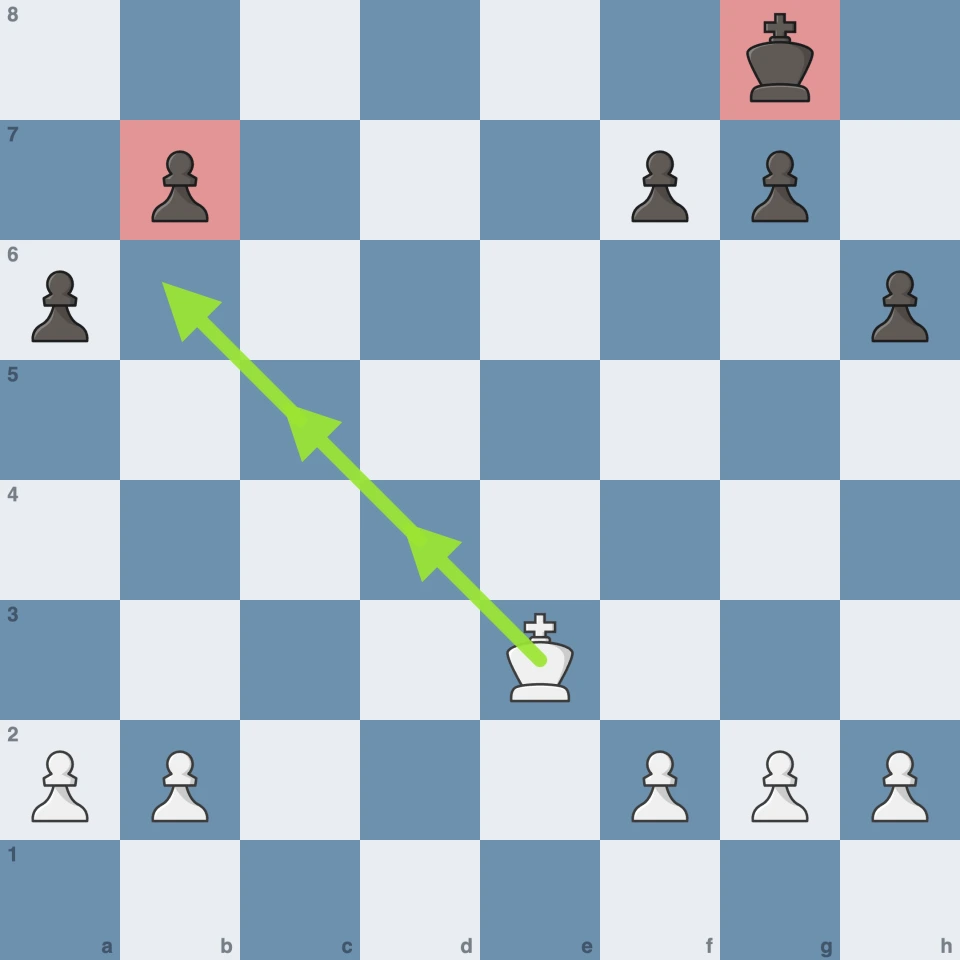
The evaluation jumped from zero to +4.9. White hasn't won a pawn — White just has a king on e3 while Black's is on g8. Next comes Kd4, Kc5, Kb6, the b7 pawn falls, and the queenside goes with it. The black king runs from g8 but arrives a move or two late. In a pawn endgame that's all it takes to lose.
Most "equal" endgames that get lost look exactly like this: nobody blundered. One king played, the other waited.
How to tell the mating danger is over
The fear makes sense — you were taught for years to keep the king safe. Here's a quick check before you bring it out:
- Are the queens off? Then it's almost always fine to go. Without a queen, your opponent rarely has enough for a mating attack.
- Do they still have two rooks, or a rook and a knight? Go, but behind your own pawns, not onto an open file: rooks hunt the king with checks along the ranks, and a knight finds forks.
- One last question before the move: what checks will they have on the new square? If none — or none that win anything — the move is safe.
With queens on the board, the king stays home; the castling rules still apply. And deciding whether to trade queens is often deciding whether your king gets to become a piece — more on that in when to trade queens.
Three king routes to the pawns
Getting out isn't enough — you need to know where to go. Nine endgames out of ten call for one of three routes.
1. To the center. e3 and d4 (e6 and d5 for Black) — the default when it's not yet clear where the fight will be. From the center, either wing is two or three moves away. From the edge, it's five.
2. To the opponent's weak pawns. If they have a backward pawn, or pawns that no other pawn can defend, the king goes hunting — just like d4–c5–b6 above. A pawn like that can only be guarded by their king, which ties their king down while yours roams free.
3. Toward the passed pawn. In front of the enemy passer, to stop it: the king is the best blockader there is, because nothing can chase it away. In front of your own, to escort it: king ahead of the pawn, not behind it. This is where opposition and the rule of the square from three endgames you must know come in.
Rook endgames work the same way. The rook holds the file, the king walks to the pawns — neither does the job alone. It's also step three of converting a winning position: an extra pawn with no king in front of it almost never queens.
A habit, not a gap in knowledge
Everyone knows "activate your king in the endgame." Games aren't lost for lack of knowing — they're lost to habit. For thirty moves your hand reached to keep the king safe, and on move thirty-one it reaches for the rook.
The cure is repetition on real positions. The Endgame section has pawn and rook endings from real games, laid out in stages from easy to hard. The judge is the endgame tablebase: it knows the exact result of every position, so the move where the win slipped away can't hide, and the opponent defends with the best moves. After a couple of dozen positions, the first king move stops being a rule and becomes a reflex.
The king that hid for thirty moves has to pull its weight in the endgame. Don't let it sit on g1.